Collecting groundwater for potable use is a basic global human need, and Franklin Electric is a pioneer in the field. Solar panels have been around for many years, and recently, costs have declined such that the solar photovoltaic (PV) industry is challenging the business model of the standard energy company. Many countries are at, or have surpassed, “grid-parity” with solar PV versus conventional energy sources.

This has made a significant impact for solar water pumping installations, now with significantly shorter ROI periods making for a more viable long-term installation. By putting the power at the source, i.e. the borewell or other water supply, a micro-grid of energy is created and dedicated to supplying the most essential life source-water.
Globally, millions of pumps still run on diesel, and hundreds of millions run on electric grids that are generated from fossil fuels. Many grids are unstable, causing premature motor failures or short windows of available electricity for which to use a water pump.
Regardless, if a farmer is living in Sub-Saharan Africa, India, or the United States of America; a cattle rancher in Texas, Brazil, or Australia; or living in a tribal village in a developing nation using a hand pump, they all depend on a reliable water source – the sun
Solar pump kit introduction
1. Overview
- The solar water pump is designed for outdoor or indoor fountain use, and is powered by a solar module. In order to make the pump work by solar energy, the solar module needs to be placed in the sunlight facing the sun.
- The pump is supplied by the battery station which is charged by a solar module. It can work for day and night.
- The special LED ring light ca lighten the fountain in the night.
- The performance of the pump depends on the sunlight intensity and orientation of the solar module.
2. Components
- Solar panel
- Solar well pump
- Installation accessories
- Fountain LED light
- Nozzle accessories
- Solar battery back-up
3. Assembling
- Unpack all components carefully.
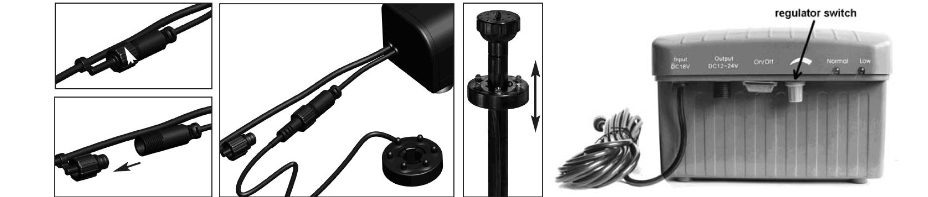
- Connect the pump to the solar pv panel.
- Connect the solar battery station to the solar panel.
- Connect the nozzle with the pump tube, the nozzle can produce 2 different jet shapes like the above picture.
- Connect the LED light to the socket like below photos, it can easily slip onto the nozzle tube or put it on the ground under water only.
- Make sure to place the pump fully underwater when the pump operates.
- To produce the excellent fountain effect , please leave the fountain head above the water surface.
- Put on the ON/OFF switch, the green indicating light on shows the system in normal condition, the solar pump is now ready to operate.
- Adjust the regular switch to get different pump performance. The pump can operate at the voltage range of 12V-24V.
4. Cautions
- Do not alter or change the components of the product.
- Do not connect the pump to any AC voltage power directly; it’s only for DC voltage power.
- Operate the pump in freshwater or saltwater only (never above 40℃), especially keep it away from flammable liquids.
- Do not strike the solar panel.
- Do not let the pump run dry.
5. Cleaning and maintenance

If after some time the pump starts losing power or stops working, please clean up sediment in the pump shell or filter cribs. Note the pump can be opened by pressing down at the bottom of the filter housing (See the above photo for demonstration).
To clear the impeller, open the solar water pump housing at the front by sliding up the front plastic cover.
To clean the solar module, wipe off the dust, leave etc.
Be careful, never drop down the ceramic axis while cleaning the impeller, it breaks easily.